Most people buy a DeWalt 20V drill driver before they own any other power tool, and most of them spend the first year fighting it. The clutch sits on the wrong number, the gear switch is in the wrong range, and the chuck is doing work the motor should be doing. A DeWalt 20V drill driver is really two tools sharing one housing: a drill for boring holes and a driver for sinking screws. Knowing which one you are asking for at any given moment is most of the skill.
I ran a general contracting crew out of Cleveland for 22 years. Decks, basements, kitchens, the whole rusty Midwest menu. In that time I have burned out more drills than most people will own in a lifetime, and every dead one hangs on a wall in my shop. Thirty-some tools up there, and I can tell you the story of each one. Nothing lands on that wall without earning its death.
This is not a spec-sheet comparison. It is how to choose between the two DeWalt 20V kits most people end up staring at, and then how to set one up and run it so you are not the next tool on my wall.
Why you should trust me
I have been the guy on the ladder, not the guy in the lab. Twenty-two years of decks, additions, and basement remodels means I bought drills with my own money, broke them on my own jobs, and paid for the replacements out of the same pocket. The graveyard wall started as a joke between me and my first apprentice. It turned into the most honest review system I know.
What that means for you is that the advice below comes off jobsites, not press releases. I judge a drill on four questions. What does it feel like at screw 50, not screw 5? Can I still buy batteries and parts for it in five years? Does the chuck still bite after 200 bit changes? Would I hand it to my apprentice on a Monday morning without a second thought? Those four questions have killed more tool recommendations than any spec sheet ever has.
I also do not care what the box says about torque. Spec torque gets measured on a warm motor with a fresh charge in a room with no wind and nobody standing on a ladder. Real torque is what is left after 50 screws, a tired arm, and a 40-degree Cleveland morning. The number that matters to you is not on the box.
How I picked and how I tested
Two kits, one platform. Both of these run on DeWalt 20V MAX, which is the whole point. The drill is just the first tool you hang on a battery system, and ten years from now you are still married to that platform, so the platform question comes before the tool question every time.
From there I look at four things, in this order:
The motor. Brushed motors have carbon brushes that wear down and die. Brushless motors do not. That single difference is usually the line between a tool that lasts a season of hard use and a tool that lasts a decade, and it is the first thing I check.
What is in the box. One battery or two, amp-hour rating, charger, bag. A kit with one pack means you stop working when the pack dies. A kit with two means you keep going.
The chuck and the clutch. The chuck is the three-jaw grip that holds the bit. A chuck that slips is a tool that lies, and I do not care how many inch-pounds the box claims. The clutch is the collar that stops the chuck from spinning at a set torque so you do not bury screws through drywall.
The battery platform's future. Can I buy packs for this in five years? DeWalt has one of the deepest lineups in the business, which is why these kits make the cut for most people.
My test routine on any drill is a 200-screw rundown, a battery run from full to dead with the charger timed, and a chuck check under load after 200 bit changes. If it cannot survive being knocked off a sawhorse once, it does not belong on my truck. Jobsites are not labs.
Which DeWalt 20V kit you actually need
These two kits look like the same drill in two boxes. They are not. One is a weekend tool with two batteries, the other is a brushless tool with one.
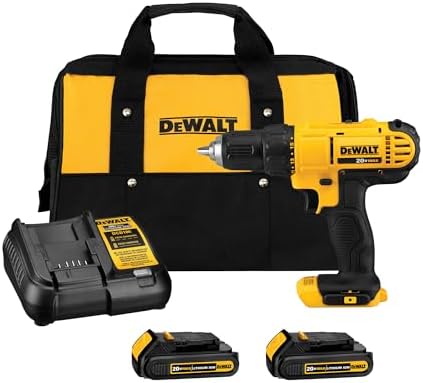
The value pick: DEWALT 20V Max Cordless Drill Driver Set, 2 Speed, High Performance Motor, Includes 2 XR 1.3Ah Li-Ion Batteries, Charger and Contractor Bag (DCD771C2)
 Visit on Amazon →
This is the kit I recommend to homeowners and to anybody buying their first serious drill. You get two 1.3Ah XR packs, a charger, and a contractor bag, plus a two-speed transmission and a high performance motor. Two batteries is the part that matters most here. The packs are small, so each one runs out sooner than a bigger pack would, but with two of them and a charger you are never standing around waiting. You swap, you keep working, you charge the dead one while you go.
The tradeoff is the motor. This is a brushed drill, which means there are carbon brushes inside that wear as you use them. For a weekend deck, a fence repair, a closet build, and hanging shelves, that is a non-issue. For somebody driving screws eight hours a day, five days a week, it is a countdown clock.
Flaws but not dealbreakers: The 1.3Ah packs are small capacity, so plan on more battery swaps than you would make with a bigger pack. The included bag is a bag. It holds the drill and not much else.
Anyone doing home projects, occasional furniture assembly, and light framing who wants two batteries in the box from day one should start here.
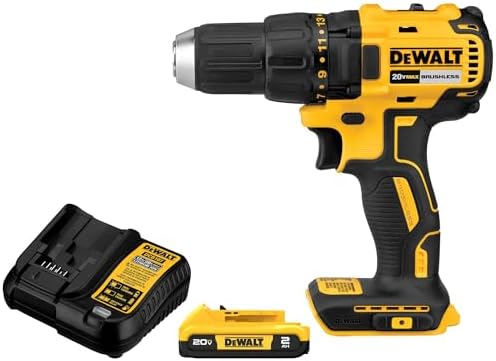
The upgrade pick: DEWALT 20V MAX Cordless Drill Driver Set, Electric Drill, Brushless 1/2 In 2 Speed, 2.0 Ah Battery and Charger Included, LED Light (DCD777D1)
 Visit on Amazon →
This is the one I would put in my own truck. Brushless motor, half-inch chuck, two-speed transmission, one 2.0Ah pack, charger, and an LED light. Brushless is not a marketing word to me. No carbon brushes means nothing inside the motor is grinding itself down every time you pull the trigger, which is why brushless tools hold up to hard use in a way brushed tools do not.
The half-inch chuck is the other thing I care about. A half-inch chuck takes the full range of bits, including the big spade bits and hole saws you will eventually want for running pipe or cable. The LED light sounds like a gimmick until you are working under a sink or inside a cabinet with no light.
Flaws but not dealbreakers: One battery in this kit. That is the honest knock. If you are working full days, buy a second pack, because one 2.0Ah pack will not carry you through a long day of drilling.
Anyone who uses a drill more than twice a month, or who wants to buy once and keep the tool for a decade, should pay up for this one.
How to set up a DeWalt 20V drill driver before the first screw
Now the part most people skip. Ten minutes here saves you stripped screws, wobbling holes, and a burnt-up motor.
Step one: charge the battery before you need it. New packs ship at a partial charge, which is fine for storage but useless for work. Put it on the charger the day you bring it home and leave it there until the light says full. Do not store packs on the charger long term. Heat is what kills lithium packs, and a charger that keeps trickling is heat.
Step two: load the bit properly. Open the chuck, push the bit all the way to the bottom of the jaws, then tighten. Hand-tighten first, then give it a final snug. If your chuck has a ratcheting grip, use it. A bit that is not seated to the bottom will wobble, and a wobbling bit makes an oversized hole and chews up screw heads.
Step three: pick your gear range. Gear 1 is slow and strong. Gear 2 is fast and weak. Use gear 1 for driving screws, for big bits, and for anything where you need control. Use gear 2 for small holes in softwood and for running screws in fast when the material is forgiving. If the drill stalls, you are in the wrong gear, not using too little pressure.
Step four: set the clutch for driving. The numbered collar is your depth control. Start low, around 5 or 6, and work up until the screw seats the way you want. When the clutch ratchets, that is the drill telling you it hit your setting. That rattle is a feature. It is what keeps you from burying a screw through drywall or snapping a head off.
Step five: switch to drill mode for holes. When you are boring a hole, turn the clutch collar past the numbers to the drill position, which locks the clutch out. A clutch that is still engaged while you are drilling will rattle and stop the bit halfway through the material. This is the number one mistake I see.
Step six: two hands, straight in. Put your body behind the drill, not beside it. Keep the bit perpendicular to the work. Let the tool do the work and stop leaning on it. If you have to push hard enough that your forearm shakes, your bit is dull or you are in the wrong gear.
Step seven: back the screw out if it starts to spin. If a screw spins in place, the hole is stripped. Back it out, fill the hole with a sliver of wood or a matchstick, and try again. Do not keep pulling the trigger and hoping.
Clutch and speed, the two settings that do the real work
If you only remember two things from this article, remember these.
The clutch is a torque limit, not a speed control. It exists so the drill stops turning before you over-drive a screw. Set it low for soft material and small screws, higher for hardwood and long screws. On a DeWalt 20V drill driver the collar clicks through the numbers and then into a drill position, and that drill position is only for making holes.
The gear switch is your power band. Gear 1 turns slower with more twisting force at the chuck. Gear 2 turns faster with less. Almost every stripped screw and smoked motor I have seen came from somebody running gear 2 on a job that wanted gear 1. Slow hands, fast work.
When a drill is the wrong tool
A drill driver is not an impact driver, and this is where people get themselves in trouble. A three-inch deck screw wants an impact driver, not a drill. An impact driver delivers sharp rotational blows that drive long screws without you leaning on the tool, and it has a quarter-inch hex collet instead of a chuck so bit changes take a second.
If you are building a deck, hanging a lot of lag screws, or driving hundreds of long screws into pressure-treated lumber, buy an impact driver and keep the drill for holes. If you are assembling furniture, hanging shelves, and running the occasional pilot hole, the drill alone is all you need.
One more caveat: a drill driver will not remove a rusted bolt or break loose a stubborn fastener. That is not what it is for, and trying will just round the head off.
What this all costs
Check current Amazon price on the value kit, and check current Amazon price on the brushless kit. The brushless one costs more up front and pays it back in years of service, because you are not replacing a burnt-out motor every couple of seasons. The value kit costs less and comes with two batteries, which is real money you would otherwise spend on a spare pack.
Then budget for the accessories nobody mentions until they need them: a decent bit set, a countersink, a few spade bits, and a second battery if you go brushless. Bits are consumables. Buy good ones and replace them when they dull, because a dull bit is what makes people lean on a drill and cook the motor.
The math I run is cost per year of service. A cheap drill that dies in 18 months costs more per year than a brushless one that runs for eight. That is the whole argument for the upgrade pick, and it is the same argument for the battery platform you are buying into. Pick the platform once, buy the tool that lasts, and stop thinking about drills for a decade.
That is the job. Set the clutch, stay in the right gear, and let the tool do the work.